WARNING: Boring technical stuff. If you don't care about the tl;dr just skip down to the first picture.
FF1 doesn't have much of an endgame, but it does have some pretty rare monsters I figured I'd hunt down for you guys. I admit I cheated a little for this part; spending hours slaughtering critters in some of the hardest dungeons in the game while desperately crossing my fingers didn't sound like fun, so I went and downloaded the encounter list from GameFAQs and did some tricksy bookkeeping to expediate the process considerably.
The encounter list in FF1 is hard-coded. There are 256 spots, and each region of the game (dungeon floors or chunks of the overworld map) has a set of encounters numbered one through eight. There is some variance in what actually populates the individual sets; you might for example see three IMPs the first time you encounter set #3, but five IMPs next time.
Most of the list is taken up with sets 1-6; sets 7 and 8 for any given area are rare encounters. Sometimes these "rare" encounters are just dupilicates of other monster sets in the area, sometimes they are out-of-depth groups (huge packs of GrIMPs, WOLFs and a GrWOLF in the original Temple of the Fiends for example)... but in three cases they are one-of-a-kind ultra rare monsters you won't see anywhere else.
If you're confused, consider this: when you first load your save the game automatically sticks resets your position in the encounter list back to the first position, which is set #3. Set #3 on the water (sailing in the SHIP) is always a pack of KYZOKUs. This is why the trick I mentioned earlier about farming KYZOKUs works; every time you save the game and do a power cycle the game goes back to the first position, and the first position is always set #3, which is always KYZOKUs on the SHIP.
Lowballers (people who play the game with the fewest possible steps, lowest possible EXP level, etc.) use the encounter list to avoid fights they know they can't win. If you're keeping track of your position in the encounter list in the Marsh Cave, for example, and you know your first encounter on the next floor is going to be a bunch of undead, you can stick on the floor above (which has different enemy groups in its sets), RUN from an easier fight there, and then not have to worry about the undead. You can also use this trick to completely avoid un-RUNnable fights like ZOIDBERGs, FrGIANTs and WORMs.

First up is the IronGOL, a rare monster way down on the Air Level of the final dungeon. IronGOLs are in set #8, so you will only encounter them four times out of 256 battles on the Air Level. By the way, the first instance of #8 on the encounter list isn't until the 129th spot, which probably explains why none of us has ever seen an IronGOL before; you have to fight 128 battles without quitting the game before you even have a chance of encountering them.
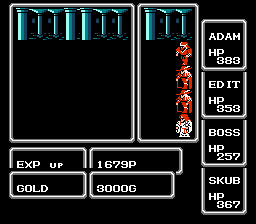
IronGOLs have an attack called TOXIC which I assume works like BANE, but it didn't stick to me. I had never actually fought one before (had no real incentive to do so before now) so I didn't know how difficult they were; FASTed Masmune was probably overkill. I actually had about 30 battles left on the list before I would find my IronGOLs, and using the encounter list helped me avoid the SORCERERs on the Air Level. When I knew my next fight was a SORCERER pack I just climbed the stairs to the Water Level to fight some WATERs instead. In this way I was able to survive a long time and gain a lot of levels.
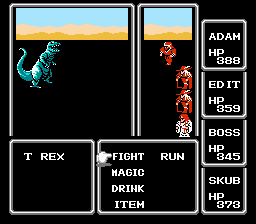
Next up is the T REX, by request. T REX is a set #8 encounter in the giant desert surrounding Mirage Tower, and once again its location on the encounter list is the reason why we've never seen them before. As a kid I remember spending countless hours roaming the desert, fighting until I got bored or had to quit, then saving the game and turning it off. I figured if I kept at it I would eventually find one of these guys. I had no idea that method of T REX hunting was doomed to failure.
Anyway, since this one is on the overworld map I used a CABIN just before the encounter to see if I could win the fight simply by attacking over and over. "Rare" doesn't necessarily mean "difficult" after all. Turns out the T REX is a total pushover, although maybe it was an unfair fight; I'm at L25 or so by this point and decked out in all the best endgame gear. If you hit one on your first walk through the desert and it eats you, don't come crying to me please.
You all knew this was coming. I'm back for a rematch, baby, and this time I'm packin' heat.
Oh wait, no I'm not, because the asshole got a surprise attack on me and one-shotted the chick holding my Masmune.
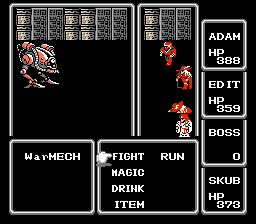
You're expecting me to say that the WarMECH is in set #8 at the top of the FLOATING CASTLE, but it is in fact in set #7, so instead of the IronGOL or T REX's 4/256 chance, the WarMECH has a whopping 12/256 chance of appearing. Rare enough to add some mystique to it (and give you a fighting chance of actually making it across the bridge to TIAMAT), but common enough to still pose a real threat. There are two spots on the encounter list where you will find WarMECHs practically back-to-back in FF1's version of the cruelest joke imaginable.
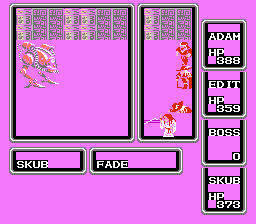
There's nothing for it, I'm just going to shoot for the moon. ADAM and EDIT are going to FAST themselves and hope for the best, while SKUB opens with FADE (which I annoyingly caught mid-flash, sorry). FADE is the strongest attack spell in the game, tied with NUKE, and it manages to deal a massive 87 damage. Considering the WarMECH has 1000 HP I doubt it even felt a mild tingle.
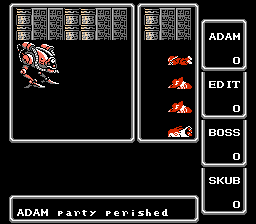
Two NUCLEARs in a row is all it takes to school me, but I never really had a chance. ADAM was doing okay damage with his FASTed Katana (100+ with a Critical Hit) but EDIT and SKUB might as well been dancing the Mamushka for all the help they were. I thought for a brief moment that maybe HEL3 + Heal Staff could keep pace with NUCLEAR's damage, but then ADAM got one-shotted by a powerful Critical and it was downhill from there.
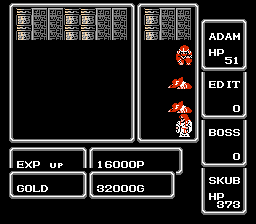
Next time goes MUCH better. This time BOSS gets a FASTed hit in the first round, and another one in the second. WarMECH rewards her with a dirt nap for her troubles, but by that time it's been weakened enough that ADAM can finish it off. The massive EXP and GOLD reward looks tempting, but of course by the time you're ready to take on WarMECHs you have no use of either.
I was L26 when I beat this guy.
The WarMECH is the only monster in the game I am not convinced every party has a way to beat. My FASTed NINJA was having trouble topping 100 damage (only 1/10 of the thing's HP); a team of THIEFs, the best of which will have a SABRed Dragon Sword, just doesn't stand a chance. Most solo games won't win because they can't get out of the last dungeon with the Masmune, which is the best way of dealing damage. A SABRed KNIGHT weilding Xcalber has a fighting chance, though.
With the WarMECH down I finally feel as though it's time for ADAM, EDIT, BOSS and SKUB to begin their well-earned retirement. Good-bye, courageous LIGHT WARRIORS!