Years ago I wrote this blog post summarizing the process of making a YouTube LP series. Recently I was asked by a Twitch viewer if I’d make a video about the process. I don’t think it’d make for an interesting video (plus capturing and editing hours of Photoshop footage doesn’t sound fun), so I’m writing this blog post instead. Since making this content is now my job, and I make so many vague allusions to “doing video work”, it’s probably a good idea to lay out exactly where all your money is going!
•
Step 1: Pick a game.
You’d think this would be the easiest part of the process, but it’s actually a bit trickier than it seems. It’s certainly trickier than it was back in 2010, when the theme of my YouTube channel was “games I loved in the 90s”, and I hadn’t already LP’d those yet. Not every game I love has the makings of a good YouTube series.
This time, the decision didn’t fall to me. My $50 Patreon reward is an LP series of your choosing, with the caveat that I don’t guarantee to like the game or say nice things about it. (See also: Sonic Adventure 2.) The chosen game was Ori and the Blind Forest, and I made sure to keep careful notes about my LP process.
Is Ori a good game for a YouTube series? I’d say yes. The game isn’t too long, there are lots of varied challenges, and the story is thick and meaty without getting boring. These are all qualities that make a game fun to watch for people who aren’t already familiar with it. The game has a lot going for it, but also some pretty deep flaws, which makes for interesting commentary. And, gosh, but it’s pretty!
Is Ori something I’d have picked myself? That’s a tougher question, and you’ll just have to wait for the live series for a detailed answer!
•
Step 2: Do a test play.
This is a super-important step that I’m very careful not to skip anymore. The idea is I want to have a good working understanding of the game in my head before I sit down to record. With few exceptions, blind recordings tend to end in disaster, and are to be avoided. Besides, viewers that like to watch the salty frustration of a blind run can always drop my my Twitch stream.
Even short games that I’ve played a million times, such as Raiders of the Lost Ark, benefit from a test play. Oftentimes games I remember as being short and breezy turn out longer and more difficult than I remember, and I have to adjust. Or I’ll have forgotten some obscure thing in the game, and it’s better to discover it now than to spend four videos searching for it.
Maybe most importantly, though, is a test play allows me to take notes about the game that turn into talking points during recording. A lot of the observations and stories you hear during a typical series are chosen ahead of time.
In the case of Ori, since I hadn’t played the game before, I decided to stream my test play. The first run of the game was pretty rocky, but it provided enough clarity to learn the game pretty well on my second test run. So before I even pushed the record button for the first time, I had already invested a good deal of time into my Ori series:
•
Step 3: Record!
The recording process is pretty much what you’d expect: boot up the game and play it with the recorders running.
For console games plugged into my capture card, I do my recording with OBS Studio. For anything else, I use Bandicam. Both of these programs are capable of recording lossless footage, which for an HD game like Ori means 50 gigabytes of raw video to sift through.
I record audio using Audacity, a program so good I can’t beleive it’s free to use.
Test recordings are as important to the process as test plays, and are another important step I make sure to never skip. There are a multitude of audio and video options I have to constantly be tweaking as I go back and forth between recording footage, streaming to Twitch, and using my PC for personal stuff. All it takes is for one box to be unchecked, and a whole session is junked. So before each session I do three quick tests: a Bandicam/OBS test to make sure the game is being recorded at the proper resolution and framerate, and to ensure the audio is coming through; an Audacity test to make sure my microphone is configured properly; and one or two minutes of the two combined.
All recording sessions require a sync point, where I know the audio and video are matched up properly. This is easy to do. I start Audacity first and say “Now!” right when I hit the record button in Bandicam. That way all I have to do is line up the beginning of the video file with the big bright spot in the audio waveform, and I’m good to go.
I try to keep recording sessions between one and two hours. Shorter sessions are more difficult to divide into YouTube-friendly chunks. Longer sessions run the risk of being ruined by corruption, crashes, or interruptions. Nothing’s worse than losing video from a game that auto-saves and keeps only one save slot. (We experienced a brown-out during my recording of Octodad: Dadliest Catch, and I had to play the whole game again from the beginning to salvage my save!)
You can tell where these recording sessions begin and end while watching one of my playlists if the first words out of my mouth are something like “Welcome back!”
Ori consists of three major game areas, plus a prologue/tutorial section, so I recorded it in four parts ranging from 45 to 90 minutes. Then I load up Sony Movie Studio to line everything up and make sure the volume levels sound nice. With that done the Ori directory in my LP folder looked something like this:
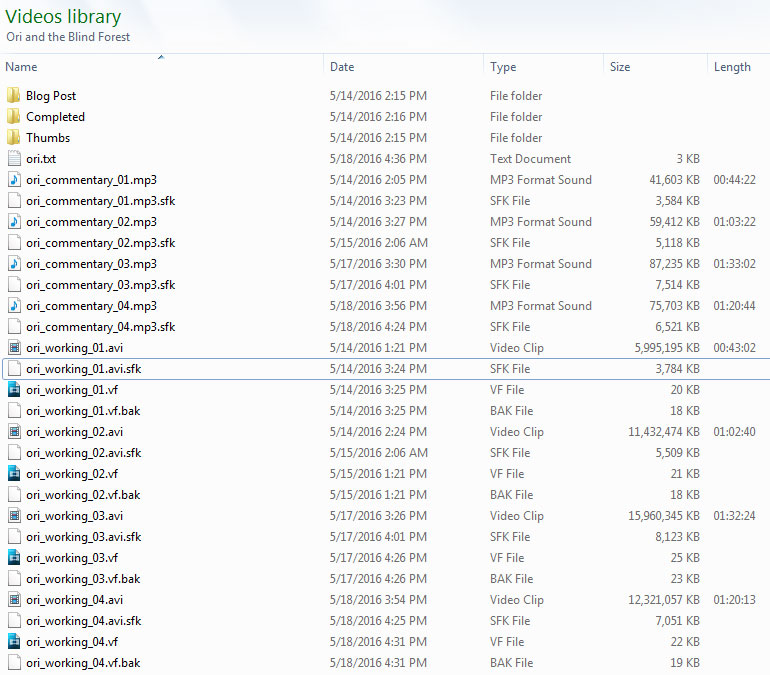
Most of these files are temporary, and get deleted once the LP is finished and sent off into my archives.
•
Step 4: Chop up the footage.
Somewhere back in pre-history YouTube had a strict 11-minute limit on videos. That limit was later raised to 16 minutes, and later still the time limit reserved as a penalty for channels who either weren’t properly confirmed or weren’t in good standing with YouTube’s TOS. My channel is confirmed and in good standing, so I can (and sometimes do) upload long videos, but I find the sweet spot to be between 15 and 20 minutes.
To calculate how many chunks each sessions should be divided into I keep a helpful calculator bookmarked: Time Calculator at ScottSeverance.us. This process requires a bit of tweaking and a bit of eyeballing, since I don’t want to chop up a sentence or a thought.
(That sometimes happens anyway, and viewers leave me comments like “Argh! Cliffhanger!” These cliffhangers are never done intentionally, but there’s value in them since, once in a while, it gives viewers a really good reason to want to see the next episode.)
With everything chopped up, I now know how many videos are in the series.
•
Step 5: Prep the txt.
Each series has a text file filled with notes that mostly get copied over into YouTube descriptions later. As soon as I know how many videos are in the series, I go ahead and prep the text file, like so:
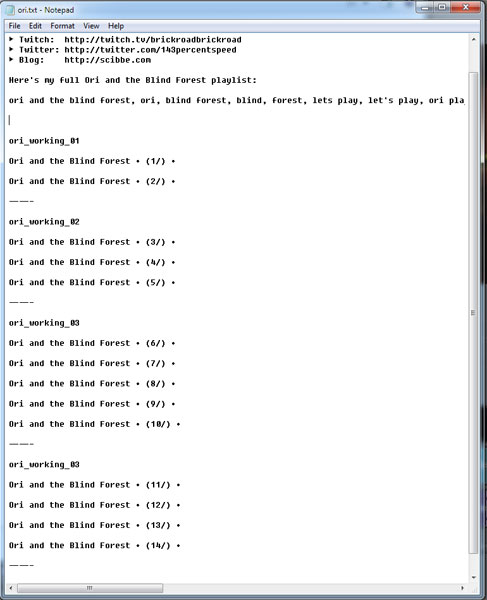
Each entry on the list is filled in later with titles and video descriptions. I also keep post-rendering instructions in this file, such as special rendering or annotation instructions, and the eventual URL of the uploaded video. Since I have to reference this file in order to make the video live, it’ll make sure I don’t miss anything down the road.
For example, in one episode of Ori I mention this blog post. When I go to make that video public some number of months from now, I have a helpful note saying “Don’t forget to put the blog post in the description!”
•
Step 6: Make YouTube thumbnails.
If I may editorialize a moment, I really hate the practice of making hundreds of identical YouTube thumbnails. A lot of channels have this pseudo-lazy practice, where their channel branding includes a single homogenized look for their thumbnails, so browsing their channel means looking at a hundred identical orange rectangles, or a hundred identical copies of the channel owner making a silly face. I say “pseudo-lazy”, because the lazier practice would just be to select one of the frames YouTube selects for your video, and go with that as the thumbnail. For years that was my preferred practice because at least then you can glance at the thumbnail and get an idea about what the video contains.
That said, there is some value to having some channel branding or information in the video thumbnail itself, to catch someone’s eye as it wanders down a list of same-y videos. My compromise is to superimpose the game’s title and episode number on a still frame from the video.
Movie Studio has a handy “take a screenshot of this frame” button, so I do that once for each episode, and stack them up into Photoshop layers. That looks something like this:
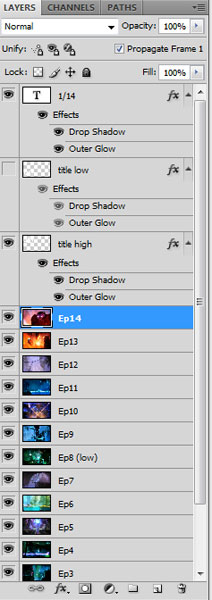
There are “title high” and “title low” layers because sometimes the interesting part of the thumbnail is in the top corner, and sometimes it’s in the bottom corner. The episode number can’t be moved to the bottom corner because YouTube automatically sticks the video length there, which sometimes makes the text there unreadable.
•
Step 7: Snippets!
Each video in a series ends with annotation links to the previous and next episodes, so those need to be made before I can render anything. I call these “snippets”.
To make the snippets, I just look for fifteen interesting seconds from each episode, chop them out of the main video, and strip the audio. After rendering these out, I have a snippet from each episode.
•
Step 8: Mock up an outro layout.
Next I have to make the outro, the part of the video with the Subscribe! and Patreon links. In pixel games, such as Clash at Demonhead, I can make a nice-looking static layout to stick everything on. For HD games like Ori, though, I lack the graphical aptitude to make a nice-looking layout. Instead, I’ll take a 16-second video clip of something kind of laid back from the game that I don’t think people will get tired of looking at video after video.
For Ori I chose some footage of Ori frollicking around a nice serene lake. In order to make sure everything looks nice I load a screenshot of my footage into Photoshop along with some contrast-y leftover shots from when I made the thumbnails, then play around with fonts and positioning until I have something like this:
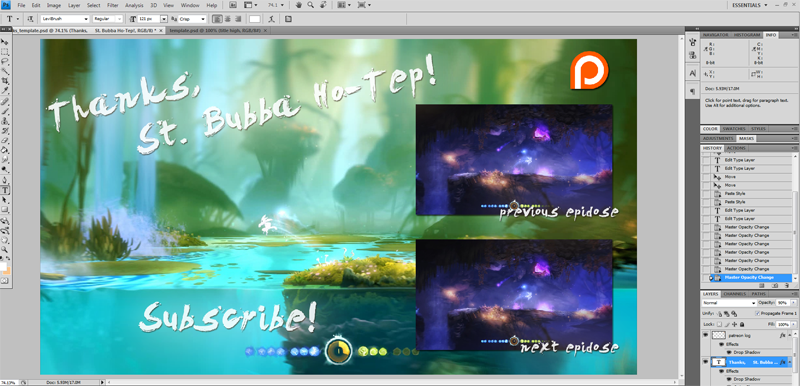
Using the mockup as a template, I can make all the outro overlays I need. Ori’s overlays are pretty simple: a dry brush font and drop shadows for the snippets. After a little noodling with the template I have as many outro overlays as I do videos to put them on; one for every Patreon supporter who gets a shoutout in that series. Which brings us to…
•
Step 9: Record shoutouts.
…recording shoutouts! This is one of my least favorite parts of the process, just because I feel silly sitting in front of the microphone saying the same sentence over and over again.
Of course, before I can record these shoutouts or finalize the outro overlays, I need to know which of my handsome and intelligent patrons is getting a shoutout for each video. For that I keep a spreadsheet of all my patrons and which LPs they’ve received shoutouts in. I compare my spreadsheet to the list in my Patreon account, making edits as needed. Once you get a shoutout, you don’t get another one until everyone’s gotten one.
I let random.org do most of the work here, although I might re-roll if someone ends up getting two shoutouts in back-to-back series. Due to the way my upload schedule works, though, that ends up not mattering all the time. I think there’s one instance in my upload history where someone got a shoutout two days in a row, because a freshly-recorded series was being uploaded alongside one that’d been recorded months ago!
•
Step 10: Scour the footage, and take notes.
This here’s my least favorite part of the whole process, because it’s boring and time-consuming. I watch every second of every video to make sure there aren’t any issues in the final product. This is my last chance to fix desynced audio, corrupted video, bleep out naughty words that slipped through, and so on. As I watch, I make a list of funny or interesting things that happen, so I can write a description and video title.
You would think this would take exactly as much time as recording, but it actually takes a bit longer. Since my work computer isn’t quite beefy enough to watch HD video in the Movie Studio preview window, lots of pausing is necessary to make sure I actually see the whole video, rather than just let it lag out.
•
Step 11: Plug in the outro.
The last thing that needs to be done before I can call it a video is stick the outro in place. This involves layering the overlay I made on top of the snippets on top of the outro footage, then fading the episode into it. That looks like this:
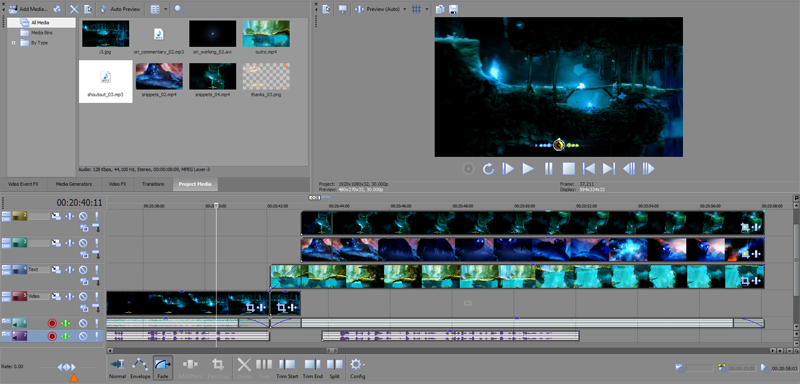
The process of lining all that up to look nice in Movie Studio takes a little while, but once it’s done I can save a preset so subsequent episodes only require a click or two. That done, the video has a nice attractive outro for all my viewers to skip!
•
Step 12: Render!
The most time-consuming step, in terms of minutes-per-episode, is rendering the file. Turning the raw footage into 720p 60fps .mp4 optimized for YouTube takes about 45 minutes, and it can be difficult to multitask since things can go awry if I don’t babysit. More than once I’ve set the computer to render a file, only to come back an hour later and find it ran into a weird error and needs to start over. Grr!
Most rendering is done on the work PC, leaving the gaming PC free. Sometimes I’ll use the time to test play the next series, or do some D&D planning, or maybe stream, but usually I just queue up something on Netflix to kill the time. I’m terrible at multitasking, so if I get too involved with another task I’ll fall behind on my rendering.
•
Step 13: Upload and annotate.
Once the watching and rendering is done, I have a pile of finished .mp4 files ready for YouTube! I back these up on two hard drives, and in most cases they just sit there until the morning of the day I upload it. In the case of a patron’s LP, like Ori, I instead upload each episode as I finish rendering and save them to an unlisted playlist. In either case, the annotations get added when the video goes live for public viewing.
(Insert long rant about how much I hate YouTube’s annotation interface here!)
•
And that’s the process! Start to finish, Ori took just over 38 hours to complete, 14 of which were test plays, and 11 of which was rendering time. Just about a full-time work week, when all is said and done.
Thanks for reading!
Leave a Reply