Another Fiesta is in the can, and while I hope to get a decent clip reel of this year’s run up on YouTube, that project will likely take me a month or so to complete. In the meantime I thought you might enjoy a brief write-up detailing how the run went. But first, here’s a quick table of all the Fiesta runs I’ve completed through the years:
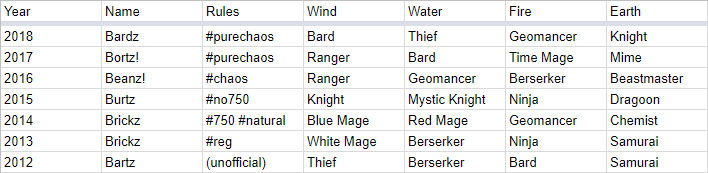
That’s seven Fiestas, and not one single Monk, Black Mage, Summoner, Dancer or Freelancer. I wouldn’t mind if my ’19 Fiesta were some combination of those jobs, especially considering they’re all pretty strong!
I’ve decided that #regpurechaos is my preferred Fiesta ruleset. Under pure chaos rules, you can roll any job (including Mime and Freelancer) for any crystal. You can end up with literally any combination of jobs, with no weight or bias towards or against any set of them. #reg tends to over-represent the earth jobs, since there are fewer of them, while #random over-represents the wind jobs, since they’re in the pool for all four rolls. #purechaos strikes just the right balance.
Standard #chaos is the same thing, but it re-orders your four jobs so you get the earliest ones first. The idea here is to minimize the time of the game you have to spend playing Freelancers. Well, the first two years I played the chaos variants, I got two fire jobs both times. This meant using Freelancers all the way through Liquid Flame. It’s a neat way to play the game, and Freelancers are actually really good — I spent a lot of this year’s run saying, “Gee, I hope I roll Freelancer for my next job!” — but I didn’t want it to happen a third year running.
My solution was to hack my GBA rom so all the jobs were available from the first crystal. This year, if I rolled a fire job into that first spot, I could switch to it right away. And that’s exactly what happened: I got Bard.
Since I’d be running the first few dungeons with a party full of Bards, Twitch chat suggested I name my hero Bardz. So I did that, and it was pretty funny.
—
A quick note about Bards…
Bard is one of the most powerful jobs in Final Fantasy V. They learn the !Hide ability, which lets them nope out of battle for as long as they want. This sounds like a joke ability but in truth it allows you to skip some really dangerous attacks in certain fights. From the moment the class is unlocked you can pick up a song called Romeo’s Ballad that acts as a free, virtually-guaranteed Stop effect. In the late game their stat-boosting songs can literally max out your Strength, Agility and even EXPERIENCE LEVEL.
The two superbosses of FFV, Omega and Shinryu, can each be defeated with nothing but Bard abilities. I don’t think there’s another job in the game that can make that claim, except maybe Chemist.
However, as soon as my run started I noticed I had a problem: because I had unlocked Bard using a cheat code, I was several hours away from gaining anything the class could actually use. Songs don’t start appearing until late in the first world.
In the past I’ve completed both of what I consider to be the toughest versions of the “single job slog”, that part of the game after you unlock your first job but before you unlock your second. Thief and White Mage are both grind-y and tedious, but I was able to make judicious use of their advantages to carry me through. Namely, Thief can !Steal better weapons at certain key points in the run, while White Mages are indestructable as long as their MP lasts.
Bards have neither advantage. I think, played by these rules, Bard is the absolute slowest possible start.
I don’t point this out for any particular reason, just pinning this badge of honor to my chest. So okay, how bad did it actually get?
—
The Single-Job Slog
Bards can do two things during the first few areas of the game: Daggers and Potions. And they don’t even start with the Daggers.
I invested all my money from the Wind Shrine into a small Potion supply, and took Karlabos down over the course of many rounds. At this point in the game one hero had a Knife, one had a Dagger, and the other two had nothing at all. I put those two heroes in the back row and had them Defend to minimize the amount of damage Karlabos could do; less damage meant fewer Potions used up. I expected to have to grind a few levels to bea tthis boss, but that ended up not being necessary. Still, I had a safety save in a second slot, because beating Karlabos locks you in the next dungeon without any means of getting back to town.
The next dungeon is the Ship Graveyard, where Daggers sometimes drop off of Skeletons. By the time I reached the end of this dungeon each of my Bards had a Dagger and the !Hide ability. The boss of the area is Siren, who has weak attacks until an abrupt phase shift where she “becomes one of the undead”. Her attacks get much stronger at this point, so I had everyone !Hide and waited until she was ready to be alive again, at which point I called the Bards forward and asked them to use their Daggers to make her not alive anymore after all.
!Hide was instrumental again in the next boss fight, against Magissa. She uses magic attacks constantly, and there aren’t enough Potions in the world to drink quickly enough to get on top of that damage, so I sent the Bards away and then went and made a sandwich while Magissa stupidly ran herself out of MP. She’s not entirely toothless at that point, though, because she can call her husband Forza forth to fight for her. Forza is essentially a tougher version of Karlabos, though, so moving the Bards to the back row and having them spam Potions was enough to (eventually) send him packing.
The next boss, Garula, marked the end of the single-job slog, but was the toughest boss by far. He dealt more damage than Forza, could inflict HP Leak, and after a phase change starts counterattacking with brutal double hits. On the back row the Bards were dealing single-digit damage, but each of Garula’s hits still took two Potions to get on top of. If I could just beat this guy I could roll my next job, and literally anything would smooth out the next part of the game. But for now he was a roadblock.
The only advantage I could reach was the Elven Mantle in the Walse Castle basement (which I abused Quicksave chicanery to grab). This accessory helps evade physical attacks, so I could, with some luck, potentially move one Bard to the front line to increase their Dagger damage.
I wasn’t sure how much leveling up was going to improve my odds. You gain HP at level up, but max HP wasn’t really the limiting factor. Garula was strong enough, and my Bards weak enough, that 1000 max HP wouldn’t be enough. The real problem was the paltry 50 healing from each Potion. To keep on top of Garula’s damage I needed three Bards spamming them at all times. If all leveling did was raise my HP, it was going to take a lot of leveling to get passed Garula.
All of the early Final Fantasy games seem to handle stats a little differently, and I get them mixed up a lot. I did some research and turned up this:
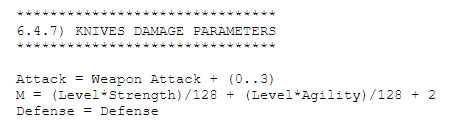
That’s a lot of jargon, but what it basically means is that, for knives, a character’s experience level factors directly into their damage output. Twice. At the beginning of the game, just a level or two should provide a noticable boost. An hour or so of grinding later my Bards had more than doubled their damage output.
There was still no way to stay ahead of the healing with everyone spamming Potions frantically, so I elected to send Faris out front with the Elven Mantle and focus on just healing her. The other Bards on the back line could Defend if they didn’t need to send a Potion Faris-ward, and Defending Bards didn’t take enough damage to need healing at all. Once or twice I did need to make Faris !Hide so everyone else could clean up the nickle-and-dime damage they’d been taking, but I still cleared the fight with about a dozen Potions to spare.
—
Job Fair Shenanigans
Going into this year’s Fiesta, I decided there were two jobs I absolutely did not want to see. Berserker is the undisputed worst job in the game, and I’ve played them three out of my seven Fiestas. Beastmaster is a dumb job with lousy abilities that don’t synergize with other classes and take lots of boring backtracking and carefully measuring enemy HP to make effective use of. I’ve only done one Fiesta with Beastmaster, but that was enough for me.
So of course my ’18 #water job was Berserker. Womp womp. I hit the Job Fair and plopped down a donation to get a reroll. The Job Fair rule is you can start using your new job right away, but I didn’t buy a new job, I bought a reroll, and I had no idea what my new job was going to be. Since these requests are manually processed I had no choice but to quit playing for the night.
When I woke up the next day, I noted my new #water job was Thief.
—
A quick note about Thieves…
After Bard, Thief is just about the worst start you can get. So you would think my Bard/Thief party would be pretty disheartening. But it wasn’t, for a few reasons.
First, I hadn’t rolled Thief since my very first Fiesta, and was looking forward to having one again.
Like Bard, Thief is a weak start, but picks up considerably in the mid-game. Thieves get lots of cool advantages no other job can replicate: they avoid back attacks entirely, they can steal items and equipment from monsters, they can skip random encounters, and they have the highest Agility score in the game. Their abilities synergize with basically every other class.
In my first Fiesta, I wasn’t really sure how to handle #fire jobs, since those jobs come at you in two sets. I didn’t know whether I should roll my job immediately upon breaking the crystal or wait until a little later when I had the whole set. I decided to wait, but “a little later” turned out to be on the other side of two of the most annoying bosses in the game. Rolling earlier wouldn’t have helped — my #fire job that year was Bard, which is one of the late #fire jobs — but that wasn’t going to be an issue this year with my All Jobs Unlocked cheat! No matter what #fire was, I was guaranteed to have it early.
With these thoughts in mind I plowed ahead to the Steamship.
—
The Other Job I Kinda Hate
The Steamship was no trouble at all. I took the opportunity to !Steal some Hi-Potions from the monsters there, and made use of !Hide again to run the boss out of MP to diminish its dangerous attacks. I rolled my #fire job and got…
…Geomancer.
This was a real bummer. I’m kinda tired of Geomancers in Fiesta runs; this is the third time I’ve gotten it. I can summarize the class like so: it’s “kinda good” in the places where it works, and absolutely worthless in the places where it doesn’t. In some areas the class gains access to decent attacks (which still pale in comparison to what any of the attacking mages can do), but in others they get bupkis. There’s nothing the player can do to influence this in any way; the class is hard-coded.
Even worse, Geomancer simply doesn’t synergize with anything. I’m not aware of any cool “Geomancer combos” or obscure killer strats. Through most of my run, my Geomancer made do with either Equip Harps (which grants a small Agility boost) or !Sing, turning them into a second Bard.
Having a second Bard on hand turned out to be okay, because this is the point in the game where !Sing becomes available. But man. Still a bummer. Part of the magic of the Fiesta is unwrapping each new job and thinking about how you’ll build your party, and Geomancer just isn’t exciting from that standpoint. It’s like a LEGO brick with no studs. It’s just a big frumpy blob that sits in your party throwing Wind Slash sometimes.
—
The Gil Grind
Geomancer sucks, but it sucks just little enough to clear Byblos and Sand Worm with no major difficulty. (These are the two bosses that would have been a nightmare with just Bard/Thief.) After this you get a ship, and sail around the world picking up new spells and equipment. For my purposes this meant finally getting some Songs:
- Mighty March, which adds Regen to the whole party,
- Alluring Air, which adds Confuse to all enemies, and
- Romeo’s Ballad, which adds Stop to all enemies.
Now I had two options to completely shut down random encounters: I could !Flee to avoid them entirely, or !Sing Romeo’s Ballad to freeze all the monsters in place while I picked them apart. This was a big boost in power and I was pretty happy right up until I hit my next roadblock: Soul Cannon.
Soul Cannon is a big gun mounted in a flying robot airship. Before fighting it, you have to destroy lots of smaller guns mounted on the flying robot airship. The Geomancer actually came in pretty handy here, with the high-powered (for this stage of the game, anyway) Wind Slash attack. Unfortunately, and somewhat arbitrarily, Soul Cannon itself is immune to wind.
This means I had to kill the boss with just my knives and stockpile of Hi-Potions. Which would be fine, except the boss makes use of the Old status ailment. A hero with Old loses experience levels until they suck too much to matter.
I reasoned that if I could get one hero to avoid being Old’d, I could solo the fight if I had to. But the only way to guarantee that was to get an Angel Ring, an accessory that blocks several nasty status ailments but commands a $50k price tag.
It was again the Thief’s time to shine. After a short while of !Stealing from some local monsters, I had a big pile of Silver Bows, War Hammers and a couple of Death Sickles to sell off. I put the Angel Ring on my strongest party member and then proceeded to trounce the fight with zero difficulty. It could have been the levels I’d gained while farming up money, or it could have just been the god-like RNG I managed to get. Either way I was passed the fight and moving on.
—
Geomancer Is Actually Good, For Once
The Ronka Ruins is a big, maze-like dungeon filled with tough monsters and absolutely gruelling boss. Fortunately for me, this is one of the few spots in the game where Geomancer is hard-coded to kick ass. I burned the dungeon up without much thought and rolled my final job: Knight.
I was really, really excited to get Knight. It’s neither one of the best jobs nor most interesting; it’s just good and consistent. Knights are the most equipment-reliant job in the game, and as a result, there is a lot of really good Knight equipment. There are only like two interesting decisions a Knight gets to make about his battle plan, but that’s two more than a Geomancer ever gets to make. And besides, my team was kinda squishy and weak, so a big strong dude up front with a greatsword made for a nice addition.
But I was stoked for another reason: Thieves are able to !Steal the elusive Genji equipment during the second world, but this set is only useful if you have a Knight to wear it. I’d never explored this synergy in a Fiesta before, and it’s actually impossible under the base ruleset, since Thief and Knight are both #wind jobs!
Suffice it to say, with my Knight leading the way, my team had no real trouble mopping up the rest of world one. Quite a lot of FFV can be plowed through if you have one consistent damage-dealer with strong back-up, and my Knight had the Bard and Thief to prop him up.
—
World Two
Things were so smooth, in fact, that there’s almost nothing to report from world two. There are a couple of gimmick bosses that most of the difficulty of the world is situated around, but there’s no point where I hit a major snag. One boon we earned from our world two explorations was the Bard’s Swift Song, which can max out the party’s speed and break the whole game open.
Atomos is a gimmick boss that some teams can beat effortlessly while some bang their heads against for eons. My team was in neither camp. The “normal” way to win this fight is to let Atomos kill someone with his unrelenting Comet spam, then pile damage onto him as he drags the corpse across the map. Raise the corpse just before it gets snarfed up, then rinse and repeat. My team had no problem with damage output, but I still tried to be a little sneaky. I recalled Atomos was susceptible to Sleep, so I had my Knight hit him with the Sleep Sword. The animation played and everything, but then the Comets started flying, so I don’t know what the haps was.
Wind Slash is a great AoE spell, but Geomancers can only use it in hard-coded places, and the fight with the four crystals is not one of those places. The plan for this fight was to take the Flame Shield from the forest (this turns into an Aegis Shield after a story event, and Aegis is the better shield, but you can get another one later in the game) so my Knight would absorb fire damage, reduce the fire crystal’s HP enough that it spammed Firaga at me, and then use the free healing to whittle the other three crystals down. What I discovered was the wind and water crystals are just slightly faster, meaning I’d sometimes see two Aqua Breaths in between healing Firagas, wiping out my Knight. With liberal application of Swift Song to get the timing right, the fight didn’t turn into a roadblock.
The boss of world two is Exdeath, and this is for many parties the hardest boss in the game. The only way to win this fight is to stack up damage and keep ahead of the healing. Some fiesta parties have neither damage nor healing. My party was about average in both regards. Geomancer is maybe good in this fight, sometimes, because she can equip an Air Knife to boost the damage from Wind Slash. (But then she rolls any of the non-Wind Slash spells and wastes her turn.) Knight’s damage output is consistent but not exemplary. There are a couple ways I could play this, but what I settled on was equipping Bone Mail and the Flame Shield on my Knight, protecting him from Exdeath’s worst attacks. To heal, the Knight could equip the Flametongue and whack himself with it. Everyone else had to rely on Phoenix Downs and Hi-Potions, which were plentiful. As long as the items held this fight was in the bag — except for one caveat. If the Knight died, I could not revive him, because Bone Mail precludes using Phoenix Downs. Exdeath has a countdown attack, one of those “30 seconds to live!” things, which meant failure. All I needed was a fight where Exdeath chose a different Doom target, which happened on the second or third try.
World two also has an optional superboss who, when you account for all the equipment and abilities you don’t have access to yet, is probably on par with Omega in terms of sheer difficulty. The Gil Turtle has one trick up its sleeve: it counters every attack with two physical attacks, hilariously called “Turtle”, which just kill you in one hit. I had two excellent advantages for this fight: my !Singers had the Requiem song, which deals big damage to undead targets, and Gil Turtle is undead. And my Knight had the !Guard command, which reduces all physical attacks to 0 damage. If I triggered the fight with my three squishies in critical HP, my Knight would automatically take their hits for them, and reduce the damage to 0 with !Guard. So the plan was to go in, pick !Guard every round, and have the Bard and Geomancer whittle the boss’s HP down with Requiem.
The one attack I didn’t have a way to avoid was the turtle’s Earth Shaker, which he always uses upon death. I tried confusing a cat enemy in the underwater dungeon to cast Float on me, because that’s a thing cats do in world one, but it didn’t work. (I’ve since learned there are cat enemies on the dragon mountain that can do this for you.) Instead, I just had my Thief !Hide for the whole fight, so I won the battle with three dead heroes and a hidden Thief at critical HP. I tweeted the dead Gil Turtle to Gilgabot as a joke, because this boss should totally be tracked as an optional fiesta challenge. This is how I learned the victory approvals are automated, and Gilgabot counted my Gil Turtle victory as a Neo Exdeath victory. That was pretty hilarious.
—
Nothing to see here, except…
World three provided little more than a speedbump for my party. They had more than enough gold to purchase a full set of Hermes Sandals, the best accessory in the game, conveying permanent Haste. With Bards !Singing Requiem the pyramid was no issue at all. Geomancer proved useful again in the Great Sea Trench, with its innate ability to avoid damage on lava floors. Thief was rockin’ it from the front line, merrily !Mugging with the Chicken Knife. The Bard picked up a few new songs, including the game-breaking Hero’s Rime.
The one hiccup here was Omniscient, at the top of Fork Tower. At first I thought I could skip this area, since I didn’t need any of the rewards. (No White or Black magic, see.) I did want that replacement Aegis Shield, which is in the waterfall dungeon, which is only accessible by submarine… which only unlocks after clearing Fork Tower. Well, rats.
Fork Tower is split into two halves. One half locks out all magic attacks, by literally disabling the Magic command in battle. The other half locks out all physical attacks, but it does so inelegantly. Most of the standard magic — !White, !Black, !Summon, what-have-you — are allowed, but a lot of other magical-type commands are disallowed, including !Sing and !Gaia. Trying to use either of these commands against the boss causes him to cast Reset and start the battle over.
There are two ways to deal with this that I know of, and neither of them are very good. The first is to run Omniscient out of MPs, so he has no juice to cast Reset. He has about seventy-three million MPs, though, so this takes six hours. The other way is to nail him with a status ailment that disables spellcasting, like Stop or Mute, then damage him with an illegal attack before the ailment wears off. Since Omniscient is an endgame boss, status ailments last only a few literal seconds. The only way to sneak into that window is with a fast hero whose turn is already ready to go when the ailment lands.
I needed my accessory slots for Reflect Rings, to protect my heroes from Omniscient’s constant barrage of spells. Lacking some other way to apply Haste, I needed to rely on Swift Song to speedify my heroes up. (Omniscient will Reset !Sing, but only if the song targets him.)
My plan was to let my heroes’ ATB fill up, use Romeo’s Ballad to inflict Stop, then immedialy have the Thief !Mug with the Chicken Knife for big damage. Unfortunately this didn’t work, and I’m not sure I understand why. The animation for Romeo’s Ballad played, which is an indication that the song landed, but Omniscient immediately Reset the fight anyway. So that wasn’t going to work.
I had to fall back on one of the silliest strategies I’ve ever had to employ in FFV: equipping a Mage Masher, attacking my own heroes, hoping the Silence spell procs off the hit, bounces off the hero’s Reflect Ring, gets through Omniscients impressive magic defense, and Silences him just long enough for the other hero to !Mug. I could use Hero’s Rime to increase my levels as high as I wanted, so each !Mug could do thousands and thousands of damage here, but there was a weird trade-off I had to be careful of: the higher my levels were, the more damage I’d be doing to myself while searching for bounced Silence procs! I found a nice happy medium and set to work.
This is a painstaking way to approach Omniscient, but it does work eventually. You don’t have to kill him all the way, just enough that he undergoes a phase change and starts using -aga spells on you, which bounce off your Reflect Rings and finish the job.
And that was that. I collected my Aegis Shield and set off for the endgame.
—
Omega
To get the coveted Triple Crown, you need to defeat three endgame bosses: Omega, Shinryu and Neo Exdeath.
Omega is susceptible to Stop in the same way Omniscient is susceptible to Silence: he immediately erases the condition, but gets his ATB reset, so if you’re Hasted you have just enough time to queue up another Stop in order to keep him locked down. With good timing, two heroes !Singing Romeo’s Ballad can accomplish this. I set my third hero to !Sing Hero’s Rime, and my fourth to attack Omega with a Coral Sword. This is the only Knight weapon that hits with lightning, which is the only way to deal more than 0 damage to the boss. With my Knight’s level steadily rising, he dealt more and more damage each round until Omega died. Nice breezy fight.
—
Shinryu
I was excited to fight Shinryu this run because, unlike Omega, you actually get a tangible reward: the Ragnarok sword. Only Knights can equip this sword, so I could actually put it to use with my party. The problem was how to win the fight. Typically what you do is inflict Berserk on Shinryu, then employ some method of surviving his constant stream of 9999-damage hits. I could do the latter with the same auto-Cover strategy that worked with Gil Turtle, but had no way of Berserking the boss.
It was Bard to the rescue again, this time with !Hide. I got a monster earlier in the dungeon to inflict Zombie status on one of my heroes. Zombie is a loss condition; if all your heroes are some combination of Zombie, Stone or KO, you lose the game. The difference between Zombie and KO is that Zombie’d characters are still targetable. This means you can put a Reflect Ring on them, !Hide with the rest of your party, and as long as your opponent has at least one reflectable attack they take damage from, you win. Eventually.
Shinryu has about two dozen different attacks, only one of which is reflectable: Atomic Ray. He has a 1/3 chance of picking this attack something like every five or six combat rounds, and each one bounces off my Zombie for about 250 damage. Shinryu has 55,000 HPs. This was going to take hours.
I didn’t see another path to victory, though, so I set the fight up, engaged Picture-in-Picture mode, and played a full run of Final Fantasy IV: Free Enterprise while waiting for Shinryu to very, very slowly kill himself.
That happened, and I claimed my Ragnarok. One boss left.
—
Neo Exdeath
I overprepared for this fight. Exdeath’s first form doesn’t have any dangerous AoE attacks, so as long as you have Phoenix Downs and Gold Needles you can sandbag the fight forever. I had two Bards !Singing the broken buff songs, and before long my Agility and Experience Level were maxed out. I went into the final battle with Ragnarok, Excalibur and the Chicken Knife, weilded by blindingly-fast L255 characters. It was a massacre.
—
Final Thoughts
The difficulty on this party was really front-loaded. That can be typical of a lot of Fiesta parties. What I liked about my team, though, was that it avoided the World Two malaise I’ve gone through with some previous team; that sinking feeling of having kinda good jobs, that you just know will be breakaway strong once you get a couple World Three advantages, but first you have to push through all the World Two gimmickry with nothing but a twinkle in your eye and a prayer in your heart. My team had some fun advantages and wasn’t terrorizing the game, but neither did we get stalled out for dumb reasons.
Bard might be my favorite job in the game. It synergizes with absolutely everything, both in the sense of giving auxilary abilities to other jobs, or making other jobs more powerful during fights. !Sing is a game-breakingly good command. Equip Harps is a good Agility boost for basically everyone but Thief. !Hide allows for shenanigans. And, of course, Swift Song and Hero’s Rime magnifies the strengths of every other job in ways even a Chemist would salivate over.
Thief and Knight are solid jobs that are fun to play with. Thief gets great abilities that work well on their own or with other jobs. Knight gets great equipment that opens up a lot of solid options. Neither of these jobs are world-shattering on their own (though they can be, with Bard backing them up…) but there’s something to be said about building a party around a solid center core, rather than just blowing the game away.
Geomancer is boring and I’m tired of it. I’ll be Job Fair-ing them away at least for my next few runs.
—
Run #2
After completing my run this year, I went on vacation for a week. When I got home, I decided to roll up a second feista run, wherein my first job was… drumroll please…
…Bard.
Welp, here we go again!
I don’t know if it would interest you but there is a FFV mod which changes a few things up and might be fun for purechaos runs:
http://jeffludwig.com/ff5a/download.php
It moves a few jobs around and the wind crystal gives you more jobs. The advance jobs are obtained at the end of world 1. It also adjusts classes slightly e.g. giving Summoner Call earlir. It also allows more customisation with the commands so that most classes are a bit like the Mime. The only thing I don’t like is that Thief was also given dual wield.
Anyway had fun watching the archive of your first run, will have to catch up with your second run.